Use Callout Classes
This section is applicable for Grid and Freeform callouts only.
Each control can be assigned one or more classes.
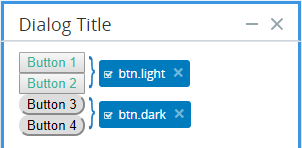
All controls in a callout that are assigned the same class will, by default, have the same appearance. In the example below, Button 1 and Button 2 share the same class, and Button 3 and Button 4 share another class.
There is no connection between classes with the same name in different callouts.
Assign a Class to a Control
If you assign an existing class to a control, the control's appearance will be updated to look like all other controls with that class. However, if any appearance setting of a control was set before a class is assigned, that setting will not be overridden by the settings of the class. If you assign a new class to a control, its appearance will remain as before.
To assign a class to a control:
-
Select the relevant control.
-
Under Classes, click
 .
. -
Type the name of the class and press Enter.
The class is assigned.
Remove a Class From a Control
If you remove a class from a control, the control's appearance will return to default.
To remove a class from a control, click ![]() on the control.
on the control.
Customize a Callout Independently of its Class
Once a class has been assigned to a control, it is possible to further customize the callout without affecting the class.
To update the appearance of a control without affecting its class:
-
Clear the checkbox within the class label.
-
Make the required changes in the Style panel.
Any changes made to the control's appearance settings will apply only to the control and not to the class.
Select that checkbox again if you want to make more changes that will also affect the class.


