

Project: Write HTML Table Data to Excel
This scenario demonstrates how to capture an HTML table as a screen element. It then demonstrates extracting data from the table to populate an Excel file.
For information about capturing screen elements, see Capture a Screen Element.
For information about the built-in Excel functions, see MS Excel.
Scenario Overview
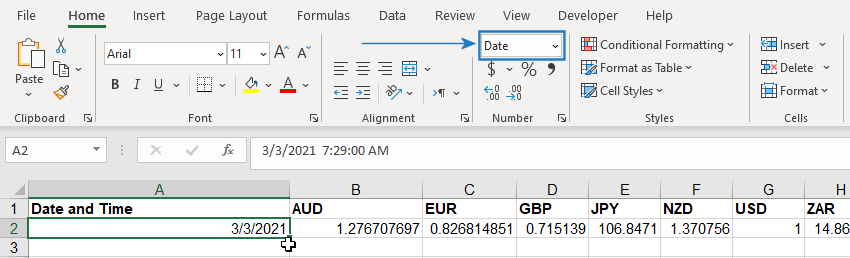
In this scenario, a workflow is created to add one new row to the Excel table shown below. The row contains exchange rate information for a selection of currencies against the United States Dollar, as well as the date and time at which the rates were updated. Every time the workflow is run it adds another row to the table.

The data can be read from currency tables at sites such as https://www.xe.com/, https://www.x-rates.com/, and https://www1.oanda.com/.
Download Project Files
-
Download the project files here.
-
Unzip and copy the files to the folder %AppData%/Nice_Systems/AutomationStudio/Project.
-
Download the Excel file here.
-
Copy the Excel file to the folder c:/temp.
Recommended Implementation Approach
This scenario is demonstrated in two parts:
-
Capture the required screen elements including the HTML table and the date and time.
-
Extract the required data and write it to the Excel file.
Capture the Screen Elements
The first step is to capture the required screen elements.
The recommended procedure is as follows:
-
Create a blank workflow.
-
Add a step to open the browser to the relevant website.
-
Capture any cell within the HTML table. The HTML table is captured as a screen element automatically.
-
Test the screen element capture.
-
Capture the date and time at which the exchange rates were last updated.
-
Run the workflow and verify that the values of the relevant screen elements indicate that the table and the date are read correctly.
The procedure is demonstrated in the following video.
Process the Data and Populate the Excel Table
The data captured from the HTML table includes a lot more information than is required for the Excel file. The relevant data must be found, arranged, and then written to Excel.
The recommended procedure is as follows:
-
Read the list of required exchange rates from the Excel file and store them in a list variable, List_of_Excel_Currencies.
-
Read the full list of currency names from the website data and store them in a list variable, List_of_Table_Currencies.
-
Read the full list of exchange rates from the website data and store them in a list variable, List_of_Table_Rates.
-
Create an empty row variable to store the data to write to the Excel file, Row_for_Excel.
-
Store the date and time read from the website as the first value in the row variable Row_for_Excel.
-
Create a variable of type Row, Row_For_Formats, that will specify the data format for each column in the Excel file.
-
For each currency listed in the Excel:
-
Find the position of that currency in the list of currencies in the website data.
-
Read the value at the same position from the list of exchange rates from the website data.
-
Add that value to the row variable.
-
-
Write the contents of the row variable to the first empty row in the Excel file.
-
Test the workflow.
The procedure is demonstrated in the following video.
Additional Improvements
One improvement you may want to make to the solution demonstrated in the videos is to ensure that the date and time are written to the Excel file in a format that Excel can recognize as a date and time instead of plain text. Doing so will enable you, for example, to create charts with the date on the horizontal axis.
In the solution project, the modified workflow is named Workflow - 1 Improved.
The standard solution writes the value read from the DateTime screen element to the row variable Row_for_Excel.

This writes the date and time into Excel exactly as displayed in the website, as plain text. Excel cannot recognize this as a date time value.

To enable Excel to recognize the pasted text as a date time value, we only need to remove the text UTC (together with the preceding space) at the end of the string.
To do so, use the Replace Subtext function from the Text built-in service.
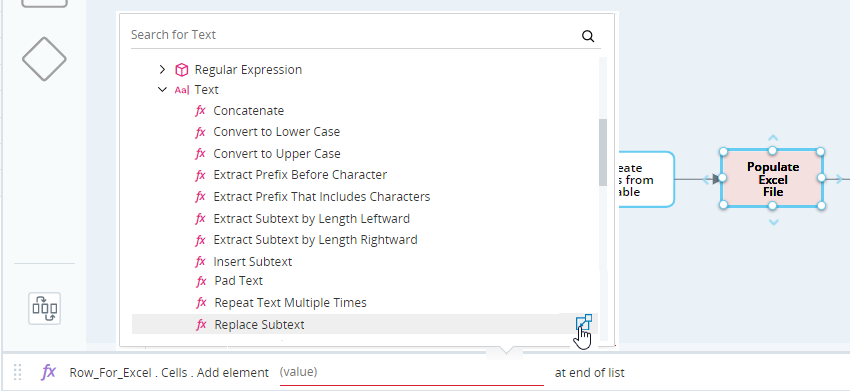
The action then is displayed as below.

Set the parameters as below.
|
Parameter |
Value |
|---|---|
|
subtext |
Set to <space>UTC. You must leave a single space before UTC to remove the text and the space before it. |
|
text |
Select the InnerText property of the DateTime screen element. |
|
with text |
Set to Empty Text as we do not want to replace the text UTC with other text, we only want to remove it.
|
|
instances |
Set to 1. There is only one instance of UTC in the text. |

The action then looks as follows:

The final change required is to set the first value in the row Row_for_Formats to datetime instead of string.
Before:

After:

When the workflow is run, Excel recognizes the date and time as a date time value, and displays it in its default format (mm/dd/yyyy).