

You can capture screen elements from any application type for which a connector is provided, including Microsoft Office applications, .Net applications, web applications running in a browser, and more. For a full list of supported application types, see Connectors.
Connectors can only capture screen elements from processes that have an Integrity level of Medium or lower. If an application is run as an administrator, its integrity level is automatically set to High and it will not be possible to capture screen elements from it.
The instructions provided below apply to all connectors. For addition information for a specific connector, see Connectors and select the connector from the list.
For instructions on capturing IBA (image-based analysis) elements, see Capture an IBA Element.
Capture a Screen Element
Each screen element must be captured individually.
Automation Studio offers multiple approaches to capturing screen elements:
-
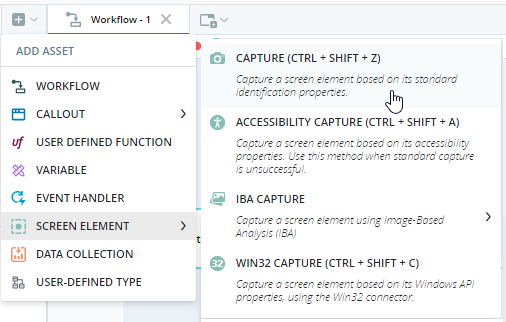
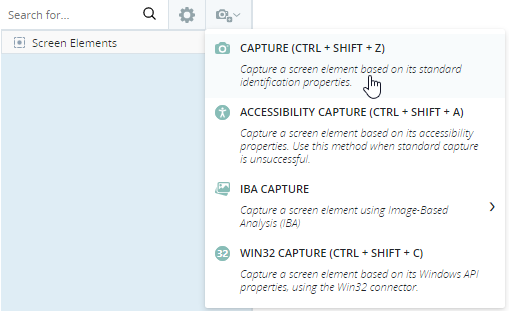
Capture: The screen element is captured based on its standard identification properties.
-
Accessibility capture: The screen element is captured based on its accessibility properties. Accessibility capture should generally only be used when Standard capture is unsuccessful.
Automation Studio can perform an Accessibility capture based on either of two technologies:
-
Microsoft's UI Automation technology: By default, Accessibility captures are performed based on this technology.
-
Microsoft's IAccessible technology: To perform an Accessibility capture using this technology, hold down the Ctrl key when clicking the element to capture.
(Available from version 7.3 onwards.)
-
-
Win32 Capture: The screen element is captured using the Win32 connector even if a more specific connector is available for the application from which the screen element is being captured. Reasons for using the Win32 Capture option include:
-
The default connector is unable to capture the screen element required.
-
You want to use one of the methods, properties or events that are available for Win32 screen elements that are not available for screen elements captured using the default connector.
For example, the Account Name field in the .NET application shown below can be captured using the default DotNET connector or using the Win32 connector.
If captured using the default capture, the screen element is saved with a type of .NET Edit.
If captured using the Win32 capture option, the screen element is saved with a type of General Win32.
-
-
IBA Capture: The screen element is captured visually, based on its appearance, location on the screen, and proximity to other items on the same screen. For instructions on capturing IBA (image-based analysis) elements, see Capture an IBA Element.


To capture a screen element:
-
Open the application that you want to capture a screen element from and ensure that the screen element you want to capture is visible.
-
Start the screen element capture process.
Either:
-
Launch the screen element capture process from Automation Studio.
Click
 above the Assets Panel and select Screen Element.
Then select the type of capture to perform.
Click
 on the Screen Elements screen.
Then select the type of capture to perform.
Click
 next to Screen Elements in the Assets Panel to perform a standard capture.
-
Use a shortcut key combination to start screen element capture.
In some situations, the screen element can only be captured using the keyboard shortcut, because returning to Automation Studio causes some screen element to disappear, for example, when trying to capture an option in a drop-down or right-click menu.
Shortcut
Action Performed
Notes
Ctrl + Shift + Z
To customize the shortcut, see below.
Ctrl + Shift +A
Captures using Microsoft's UI Automation technology.
To capture using Microsoft's IAccessible technology, press Ctrl + Shift+ A to start capture and press Ctrl when clicking the element itself.
Ctrl + Shift + C
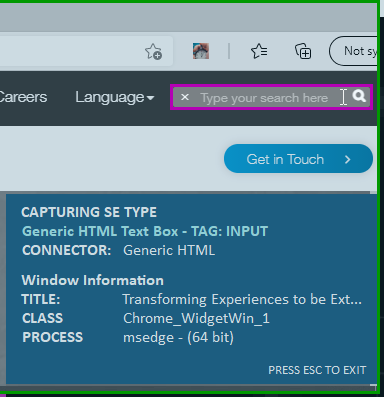
The Capturing Assistant displays automatically when screen capture is launched. The Capturing Assistant provides identifying information of each screen element as your cursor hovers over it. Where screen elements overlap, or where they are located close together, the information provided can help ensure that you are capturing the correct screen element.
-
-
Click (or right-click) on the required screen element.
If you are performing an Accessibility capture, hold down the Ctrl key when clicking the screen element if you want the capture to be based on Microsoft's IAccessible technology instead of Microsoft's UI Automation technology.
In the example below, the search entry field is selected.
The screen element is captured and appears in Automation Studio. The captured screen element is marked in a red rectangle.
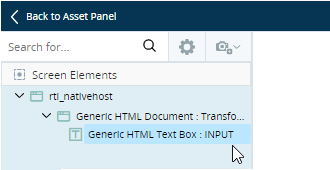
The captured element is listed in the tree of the Screen Elements screen.
The captured element is also listed in the Assets Panel. All of its methods, properties, and events are listed below it.
-
Change the default name in the Name field to be more recognizable.
-
Edit the various settings for the screen element as necessary.


Customize the Screen Element Capture Keyboard Shortcut
The keyboard shortcuts for the three screen element capture methods can be modified from their default values.
To modify the screen element capture keyboard shortcuts :
-
Close Automation Studio if open.
-
Open the file %appdata%\Nice_Systems\AutomationStudio\AutomationStudio.exe.config for editing.
-
Locate and edit the following line as necessary:
<HotKeySettings>
<add keyCode="Ctrl+Shift+Z" command="capture"></add>
<add keyCode="Ctrl+Shift+A" command="Accessibility_Capture"></add>
<add keyCode="Ctrl+Shift+C" command="Win32_capture"></add>
</HotKeySettings>
-
Save the file.
-
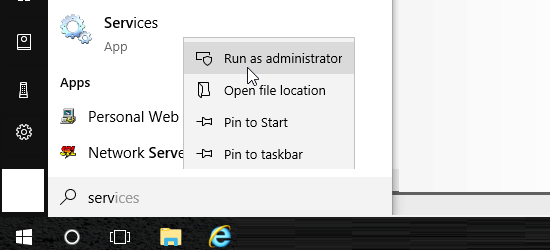
From the Windows Start menu, launch the Services app as an administrator.
-
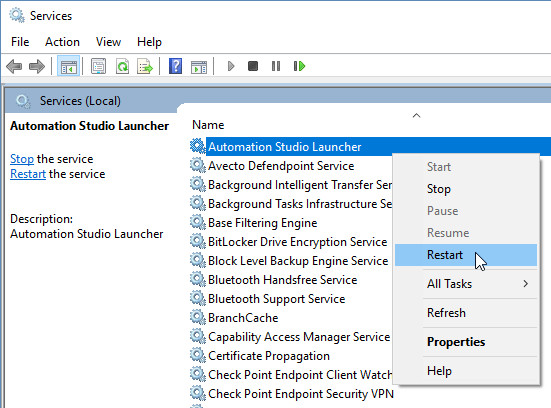
Locate and restart the Automation Studio Launcher service.
-
Open Automation Studio. The Screen Element Capture wizard will launch whenever you press the new keyboard shortcut.