

Edit a Screen Element
The Screen Elements tab allows you to specify how a specific screen element should be treated and identified during run-time.

This topic explains how to edit a screen element captured using a connector. For IBA (image-based analysis) elements, see Edit an IBA Element.
The instructions provided below apply to all connectors. For additional information for a specific connector, select the connector from the list of Connectors.
Open the Screen Elements Tab
The Screen Elements tab is displayed automatically after capturing a screen element.
To open the screen elements tab at any other time, either:
-
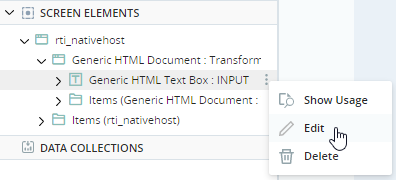
Hover over the screen element you want to edit, click the Menu button
 , and click Edit.
 -
Click the Screen Elements tab below the Assets Panel.

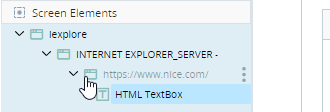
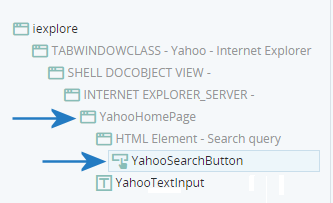
View the Element Hierarchy
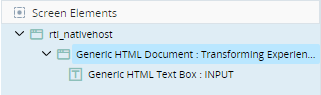
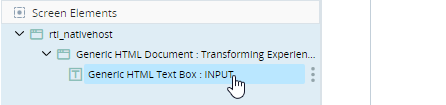
The Element Hierarchy is displayed at the left of the Screen Elements tab. The process from which the screen element was captured is listed at the top of the hierarchy, and the actual screen element at the bottom. Which elements are listed in between those depends on the application type.
From the hierarchy, you can:
-
Click any element to view and edit its details.
-
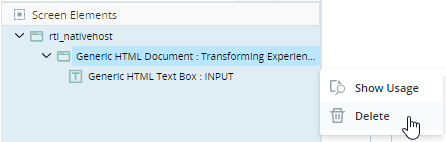
Click the menu button
and then either delete the element or open the Usage Reference Panel for a list of all places where the element is used in the project.
Name the Screen Element
The captured screen element is assigned a name automatically, for example:

You should change the name to a name you will be able to recognize in your project, for example:

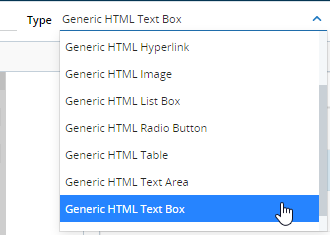
Select the Screen Element Type
The type of the captured screen element is determined automatically but you should verify that the type is correct and modify it if necessary.
The assets (methods, properties, and events) that are made available for the element depend on the type assigned to the element.
Choose the type from the drop-down list.
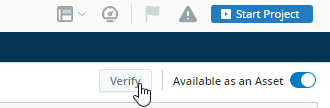
Test a Screen Element
You can check whether a captured screen element can be correctly identified using the current recognition property settings.
Any item in a captured element's hierarchy can be located, except for the process (top) level.
To test a screen element:
-
Make sure that the application from which the screen element was captured is open, and that the screen element is displayed.
-
Click Verify.
If the element can be recognized, the relevant window is displayed and the selected element is highlighted. A success message is displayed:
If the element cannot be recognized, for example, if the screen element no longer exists or the recognition properties are not valid, a failure message is displayed:


Set Availability as an Asset
By default, all screen elements you capture are listed in the Assets Panel and can be used as assets in the project. You can choose to prevent some of the screen elements from being listed in the Assets Panel and being treated as assets in the project.
For example:
-
To prevent your Assets Panel from becoming cluttered, you may want to remove captured screen elements that aren't needed although you might not want to delete them completely from your project.
-
When you capture a screen element, the entire hierarchy of elements is captured as well. If you won't be using those interim elements, you likely won't want them cluttering the Assets Panel.
Whether a screen element will be listed in the Assets Panel and can be used as an asset depends on the Available as an Asset setting.

When set to Off, the screen element will not be listed in the Assets Panel and cannot be used as an asset. The screen element will continue to be displayed in the hierarchy on the Screen Elements tab but will be displayed as disabled.
If the screen element is already in use as an asset, Available as an Asset can still be turned off. However, this will result in an error wherever the asset is used.
-
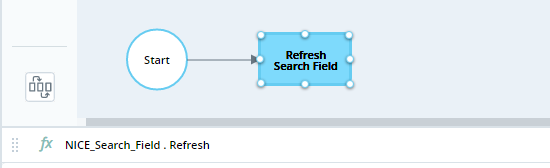
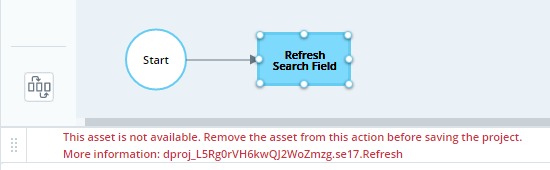
The Refresh method of the NICE_Search_Field screen element is used in the workflow below.
-
If the NICE_Search_Field screen element is set to not be available, an error message is shown in place of the Refresh method.
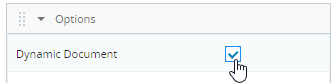
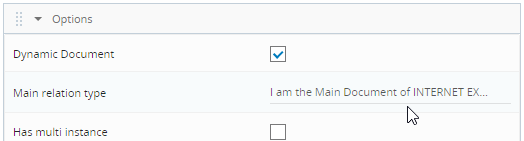
Dynamic Document
The Dynamic Document setting is listed on the Options panel.
From 7.9, Dynamic Document recognition automatic, with no need to specify whether your screen elements update dynamically or not.
This option is relevant only for screen elements of type HTML Document, for either Internet Explorer or Generic HTML processes.
Select this option if the web site's screen elements update dynamically (without refreshing and without changes to the URL) to ensure that the web site's contents are rescanned frequently.
Do not select this option unnecessarily as the frequent scanning of a web site slows performance.
Set Multi Instance Behavior
Multi instance support allows you to ensure that Automation Studio will consistently relate to a specific instance of a screen element in cases where multiple instances of the screen element exist at the same time. This means that if multiple instances of a screen element exist:
-
Every time you apply a method of the screen element, the method will be applied to the same instance of the screen element.
-
The solution will react only to events raised by one specific instance of the screen element.
-
Screen element property values will be read only from one specific instance of the screen element.
By default, multi instance support is not activated when capturing a screen element.
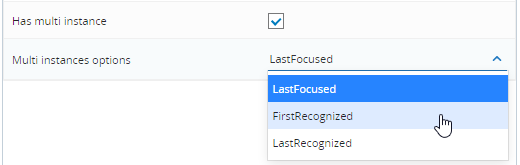
After enabling multi instance support for a screen element, you must select the policy by which Automation Studio will decide which instance of the screen element to relate to. The options are listed below.
|
Rule |
Description |
|---|---|
|
Last Focused |
Relate to the instance of the application that was active most recently. In the case of web browsers, relate to the last active tab of the last active instance of the browser. |
|
First Recognized |
Relate to the instance of the application that was opened first, even if subsequent instances were opened and one of them is currently active. |
|
Last Recognized |
Relate to the instance of the application that was opened last, even if an instance that was opened previously is now active. |
Multi Instances should always be selected if there is a chance that multiple instances will exist. Do not select Multi Instances if there won't be multiple instances, for example, in an unattended solution.
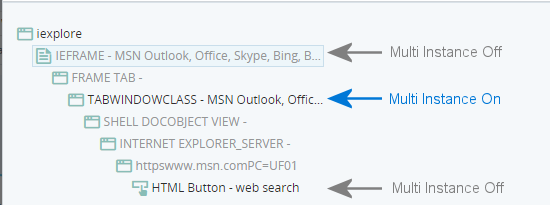
Only select Multi Instances for the items in the screen element hierarchy that may exist in multiple instances. For example, if you may have multiple Internet Explorer tabs open to the same search site, you would select Multi Instances only for the tab element, but not for the IEFrame element above it or for the HTML Button element below it.
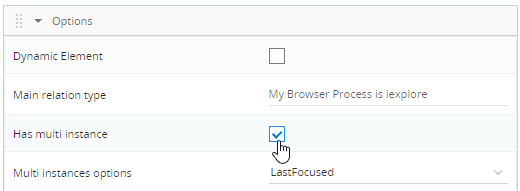
To activate and configure multi instance support for a screen element:
-
Select Has Multi Instance to enable multi instance support:
-
To specify which instance of the application the real-time client should relate to during run-time, select the rule to apply:
Set an Element's Recognition Properties
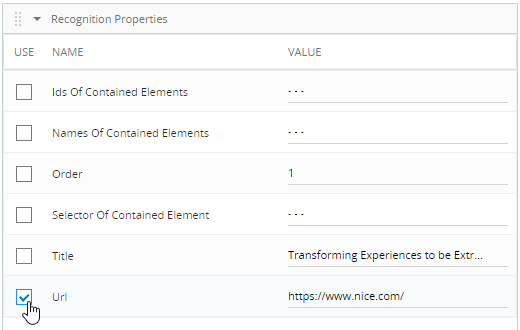
You can select which of an element's properties should be used to identify the element. You can also edit the values of the recognition properties.
Automation Studio automatically chooses a set of default properties when capturing the screen element, but you can modify that selection.
The properties available depend on the element type.
At least one property must be selected.
To modify a screen element's recognition properties:
-
Select the property or properties to be used to recognize the element:
-
Edit the values of recognition properties if necessary.

Using Multiple Values for a Recognition Property
(From version 7.6)
You have the option of using multiple values for a single recognition property on the document level. This may help to make your automation more flexible, by broadening the range of values it can accept.
The recognition properties that support this functionality are assigned the logical OR operator  in the ACTIONS column. To add an additional value to the recognition property, click and assign a value.
Reset an Element's Recognition Properties
You can reset a screen element's recognition properties to their original values at the time of capturing by clicking  on the top-right of the Recognition Properties panel.
Identify an Element's Main Relation Type
The screen element's main relation type is displayed on the Options panel.
Best Practices
Note the following best practices:
-
Select as few recognition properties as possible for each screen element.
-
For web applications, the recommended recognition properties to use are listed below in descending order of preference:
-
ID
-
Selectors
-
XPath
-
-
Give each captured screen element a meaningful name. In many cases it is also useful to modify the names of screen elements higher in the hierarchy. For example, if you capture an element from a web page, it is recommended to rename the HTML Document element above it with a meaningful name too.
-
The recommended naming convention for a screen element is Upper CamelCase, for example, SearchButton and FirstNameField.
-
It is often useful to include descriptors of the screen element's type and location, for example, using a convention of <Page Name><Control Type><Name>, for example:
-
Payment.TextBox.Street (or Payment.txt.Street)
-
Account.ComboBox.Country (or Account.cmb.Country)
-
-
After capturing a screen element, close the application, reopen it, and locate the screen element again to ensure that the identification properties set are reliable. In some cases, the values of the identification properties differ each time the application is opened. This is particularly true for web applications.