

Debugging Tips
This topic provides tips on debugging an Automation Studio project.
Test Workflow Transition Conditions
Workflows often fail because the conditions on transitions are incorrect.
Below are tips for testing a workflow's transition conditions.
Watch the workflow run in Automation Studio
Run the problematic workflow and instead of watching the activity on the application, watch the progress of the workflow in Automation Studio.
Some problems might be obvious, for example, the condition on a transition is likely incorrect if:
-
The workflow gets stuck at a transition and when looking at the application you can see that the workflow should be continuing.
-
The workflow progresses across a transition in less time than you would expect the application to take to be ready for the next step.
Use breakpoints to check transition conditions
When a workflow fails to interact with an application as expected, for example, a button click is not performed, likely causes are:
-
A screen element's recognition properties are not correctly defined.
-
The conditions on the transition entering a step are not delaying the step effectively - the workflow is being allowed to continue before the application is ready for the next step.
To rule out problems with the transition condition before the step at which interaction with the application is failing:
-
Place a breakpoint on the step that follows the transition.
-
Run the workflow.
-
Wait until the application is ready to run the step following the transition. When it is, press Continue to run that step.
If:
-
The workflow works as expected, the screen element is correctly defined and the transition condition is almost certainly to blame.
-
The workflow still does not work, then the screen element's recognition properties, or the actions the step performs, may be at fault. See Test Screen Element Recognition.
-
Test Workflow Steps
The following tips can help when debugging workflow steps.
Use breakpoints
Add a breakpoint to the step you want to test and to the step after it. When running the workflow, use the Debug Panel to check that the step performs the required actions, for example, that the values of variables change as expected. If the step performs actions inside an application, you can check that the expected changes are performed.
Use extra variables for testing purposes
Create extra variables for testing purposes only and populate those variables within a step to help with debugging.
For example:
-
You can use variables within an IF statement to check which IF condition was actually met when the workflow ran.
 Show example
The workflow step includes an If statement. So that we can see which branch of the If statement was processed, we write some text to a variable temp_If_Branch.
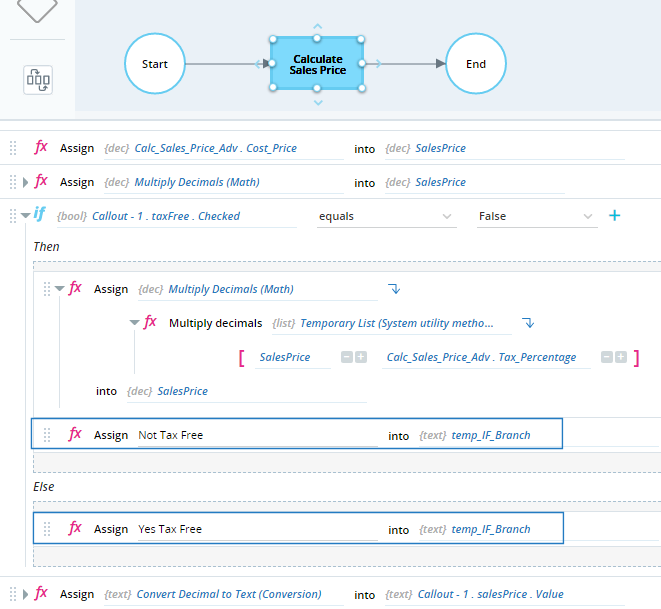
After the workflow is run, we can see the value of that variable in the Debug Panel. Later, we can remove the variable from the project.

-
If the same variable is modified multiple times during the same step and is ending with an incorrect value, use temporary variables to store that variable's value at each stage to help with debugging.
Show example
This workflow calculates the final sales price in three stages in which the SalesPrice variable is first set to the cost price, then increased by the markup percentage, and then increased by the tax percentage.

Debugging this step could be difficult. For example, there is no way to check if the second step (Add Mark Up to Sales Price) is being performed correctly. Instead, you can populate another variable, temp_Price_After_Mark_Up, as shown below.

When running the project, in the Debug Panel we can see the final Sales Price as well as the Price After Mark Up (before tax). Once the solution is finalized, we could delete that variable as it is not needed for the functioning of the solution.

Test individual sections of a workflow
When testing long workflows, it can help to disconnect some steps so you can test an individual section of the workflow.
For example:
-
If your workflow modifies a variable's value at each step, temporarily disconnect the transition leading out the first step so you can check the variable's value at that point (as an alternative to using a breakpoint).
-
If the workflow interacts with an application over multiple workflow steps, to test the later steps it might be easier to disconnect the earlier steps and manually prepare the application for the later steps.
Show example
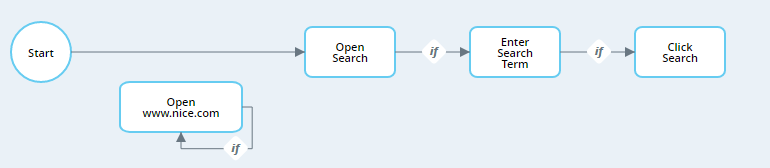
This workflow opens the Edge browser to a specific web page and then performs a search.

If you know that the first step and the transition out of the first step work well, for testing later steps you can temporarily disconnect that first step and instead open the website manually yourself before running the workflow. (This example is simplistic but on longer workflows this tactic can speed up testing and debugging.)
Test Screen Element Recognition
If the automation solution fails to perform an interaction with a screen element in an application, the recognition properties of that screen element may not be correct.
Specifically, the recognition properties might be:
-
Incorrect, such that the screen element will not be recognized under any circumstances.
-
Too specific, such that the screen element might be recognized under certain circumstances only.
Below are some tips for testing a screen element's recognition properties:
Use the Debug Panel to test recognition during the manual process
While the Debug Panel is typically used to monitor asset properties and variable values while workflows are running, it can be a useful tool to use while performing the process manually. Specifically, you can see the state and property values of all screen elements in the project.
To use the Debug Panel to test screen elements:
-
Disable any event handler that will start a workflow when the project is loaded.
-
Click Start Project.
-
Expand the Debug Panel. The Debug Panel continually indicates whether each screen element is currently being recognized or not.
-
Manually perform the process you are trying to automate.
At each stage, check:
-
Whether the screen elements that are currently displayed in the application are being recognized in the Debug Panel.
-
If the screen elements' properties have been assigned their expected values.
-
-
Perform the manual process multiple times with relevant variations to make sure that the screen elements are consistently and reliably recognized.
If a screen element is not being recognized, the problem is likely with the way its recognition properties are defined.
See the resources below:
Use the Edit Screen Element window to test recognition during the manual process
You can also perform the manual process and test each screen element from the Edit Screen Element window using the Verify button. This method takes longer than the method above, but has some advantages:
-
If the screen element can't be located, you can edit its settings immediately and then retest.
-
After clicking Verify, you can switch to the application window to ensure that the location block is drawn around the correct screen element.
Additional Tips
Design for simplicity
Avoid very long and complex workflows. Consider building smaller workflows that get invoked as needed from a main workflow. Each workflow will be easier to build, test, and debug.
Fix issues when found
If you are trying to find the cause of a particular issue, and while doing so, you find another problem that you do know how to fix, you should consider fixing that issue before continuing, for the reasons below:
-
The knock-on effect of one issue is not always obvious. Solving the second issue you found might solve the original issue you were trying to solve.
-
Solving the first issue will be made more complicated when the solution's behavior is already unpredictable due to the second issue.