

Project: Retrieve Data from a Web Application
This scenario demonstrates how to create an attended automation that retrieves requested information from a web application and displays it to the agent in a callout.
This project demonstrates the following Automation Studio features:
-
Capturing screen elements in a web application. See Manage Screen Elements.
-
Building a workflow to automate interaction with screen elements in a web application. See Best Practices for Using Screen Elements in Workflows.
-
Creating a callout. See Design Callouts.
-
Building an event handler. See Define Event Handlers.
Scenario Overview
In this scenario, the agent is shown a callout as below.
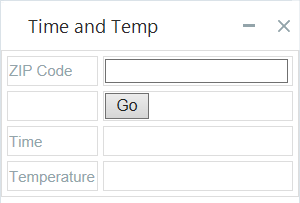
The agent enters any valid United States ZIP code.

When the agent clicks the Go button, a workflow is invoked. The workflow opens a web site that provides time and weather information for any location by ZIP code and retrieves the current time and temperature for that location.
The retrieved information is displayed in the callout.

Download Project Files
-
Download the project files here.
-
Unzip and copy the files to the folder %AppData%/Nice_Systems/AutomationStudio/Project.
Recommended Implementation Approach
This scenario is demonstrated in two parts:
-
Automate the interaction with the web site.
-
Build an interactive callout.
Automate the Interaction with the Web Site
The first step is to build a workflow that will automate the interaction with a web site that provides time and weather information by ZIP code.
Examples of such sites include https://www.timeanddate.com/, https://www.wunderground.com/, and https://weatherstreet.com/.
The recommended procedure is as follows:
-
Create a workflow and add a step to open the web site in a browser. The demonstration uses Microsoft Edge.
Test the workflow.
-
Capture the following screen elements from the web site's home page:
-
The search field into which you can enter a ZIP code
-
The search button to click after entering a ZIP code
Test the screen elements.
-
-
Add a workflow step to enter a specific ZIP code in the web site's search field.
-
Add a workflow step to click the search button.
Test the workflow.
-
Capture the following screen elements from the web site's results page:
-
The temperature
-
The current time
Test the screen elements.
-
-
Create text variables:
-
current_time
-
temperature
-
-
Add a workflow step to populate the variables with the values retrieved from the web site.
Test the workflow.
-
Test that the workflow works as expected when a different ZIP code is specified.
-
Add a workflow step to close the web browser.
Test the workflow.
The procedure is demonstrated in the following video.
Build an Interactive Callout
Once you have built a workflow that successfully automates the interaction with the web site, the next step is to build the callout that will be displayed to the agent.
The callout must allow the agent to enter a ZIP code and then invoke the workflow to retrieve the time and temperature information from the web site. Finally, the callout must display the time and temperature information retrieved.
The recommended procedure is as follows:
-
Modify the workflow so that instead of the ZIP code to search for being hard-coded, the ZIP code will be specified by a workflow parameter.
-
Create a new, blank callout.
-
Add a table to the callout to act as a grid into which other callout controls can be placed neatly.
-
Add label controls to display the static text required.
-
Add an input field control to the callout. This is where the agent will enter the ZIP code.
-
Add a button control to the callout. The agent will click this button after entering the ZIP code.
-
Add label controls to display the time and temperature values retrieved.
-
Modify the title of the callout.
-
Preview the callout.
-
Add functionality to the callout button. When the button is pressed, the workflow must be invoked to retrieve time and temperature information for the ZIP code the agent entered into the callout.
Test the workflow.
-
Create an event handler to display the callout when the project is loaded.
Test the event handler.
-
Modify the workflow to dynamically set the values of the label controls in the callout to the retrieved values for time and temperature.
-
Test the completed solution.
The procedure is demonstrated in the following video.