

Add Steps and Transitions to a Workflow
Each step in a workflow represents a logical operation that the workflow will perform. Transitions are the connections between steps and decisions.
Add Steps to a Workflow
-
Open the workflow to work on.
-
Drag a step from the sidebar onto the workflow canvas.
-
Rearrange the steps as needed. The guide line helps you to align the steps neatly.

Modify a Step
Once a step has been placed on the workflow canvas, right-click the step to:
-
Open the Usage Reference panel to identify if and where the step is referenced in the project.
-
Rename the step
-
Delete the step

Copy and Paste a Step
You can copy and paste a step within a workflow, or into a separate workflow. This allows you to easily reuse a step in your project. All the logic in the original step is included in the copied step.
To copy a step, right-click the step > Copy Step.
To paste a copied step, right-click the workflow canvas > Paste Step.
If any of the following actions occur between Copy Step and Paste Step, the step will not be pasted:
- Name of step is changed
- Step is deleted
- The logic within the step is changed
Limitations:
- You cannot paste a step that contains the Start method of workflow X onto workflow X's canvas.
- You cannot paste a step that contains the Set Result method of workflow X outside workflow X's canvas.
- You cannot paste a step that uses its workflow parameters outside of its workflow.
- You can only copy and paste one step at a time.
- The Automation Studio clipboard is cleared after closing a project, or switching between projects.
Cut and Paste a Step
You can cut and paste a step within a workflow, or into a separate workflow. This allows you to easily relocate a step in your project. All the logic in the original step is included in the pasted step.
When cutting a step, the border of the step becomes dotted, signifying that you are in the process of cut and paste. After you paste the step, the border returns to its solid state.
To cut a step, right-click the step > Cut Step.
To paste a cut step, right-click the workflow canvas > Paste Step.
In general, the guidelines are the same as for copy and paste, with the following additions:
- You cannot undo a cut and paste action.
- Pressing Esc between cut and paste cancels the cut.
- Dragging a step between cut and paste cancels the cut.
- You cannot cut a step that is in use.
- Cutting and pasting a step removes all transitions associated with the step.
Add a Transition Between Steps
A transition specifies which step should be run after the current step ends.
Note the following:
-
Each step can have multiple transitions exiting it, but only if conditions are placed on those transitions - otherwise only one transition may exit each step.
-
Each step can have multiple transitions entering it.
-
Any step that does not have a transition entering it will not be performed at run-time.
-
It is not necessary to connect any step to the End step. However, if you want to display workflow execution information in the Automation Portal, the End step must be connected or the Automation Portal will not register that the workflow ended.
To add a transition between steps:
-
Click the step from which the transition must start.
-
Click on one of the anchors around the step and drag a connector towards the next step.
As you approach another step, its anchors are displayed. Drag the transition to one of those anchors and release.

Modify a Transition
Once a transition has been placed between steps you can:
-
Delete the transition: Click the transition and then click
 .
. -
Reroute the transition: Grab one end of the transition and drag it to a different anchor of the same step or an anchor of a different step.
-
Add a condition to a transition, so that the transition will only be followed once some condition is met.


Best Practices
Note the following best practices:
-
Avoid including more than 20 steps per workflow.
-
Instead of one large and complex workflow, create one main workflow that invokes sub-workflows. Those sub-workflows can often be reused. The main workflow can be made to wait until the sub-workflow ends.
-
If multiple transitions exit a workflow step, only one will be followed, so ensure that mutually exclusive conditions are applied to all transitions exiting a step. See Add a Condition to a Transition.
-
Ensure that a workflow (and all sub-workflows) end as expected when an interaction ends.
Ideally, use the workflow's End methods to terminate all workflows as part of a reset mechanism.
For unattended solutions, define timeouts for the main workflow and all sub-workflows. Defining timeouts for sub-workflows provides for more granular error handling and control.
Prepare common timeout handling. When a timeout occurs, make sure to close the main workflow and sub-workflows after performing any necessary error handling.
If a workflow does not terminate, it will not start the next time it is invoked. When you try to start a workflow that is already running, nothing happens, other than a record in the log notifying of an error.
-
For robotic automation workflows, it is recommended to set a timeout (that includes invoking the End workflow method), ensuring that the workflow terminates no matter what kind of unexpected error happens during execution. This ensures that in the event of either a logical or technical failure occurs, the workflow ends.
-
At the end of a robotic automation workflow, as well as during any workflow error handling, reset all the objects necessary to re-run the workflow, including the sub-workflows, business entities, and so on.
-
Do not apply a timeout to an attended automation that depends on user input.
-
Use of workflow loops to cycle through lists to search for an element or to perform an action on each element is not recommended for performance reasons. Preferably use a For-Each block within a single step.
-
When using workflow loops to cycle through a list to find a particular element, add a condition to exit the loop once the element has been found.
-
Ideally, retrying an action on a screen element until it succeeds should be avoided. For example, improving workflow transitions to ensure that a screen element exists before it is clicked can be effective. See Best Practices for Using Screen Elements in Workflows.
However, in some cases retrying an action is the only way to ensure that the action is ultimately performed. If such a loop is used, always limit the number of attempts that will be performed by using a counter.
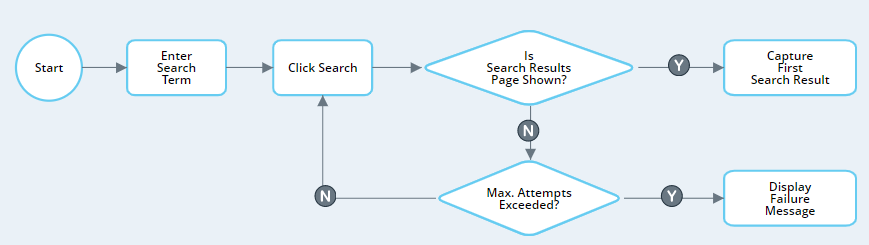
An example workflow is shown below. In this application, the site does not always react to clicking the Search button. The workflow will try clicking search only four times, after which a failure message is displayed.
The actions for each relevant step are shown below:
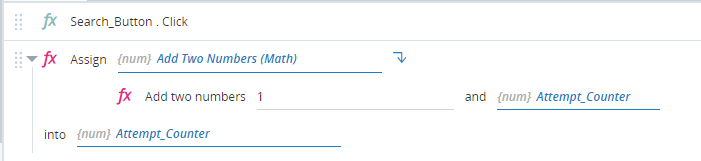
 Click Search
The variable Attempt_Counter is incremented each time the Search button is clicked.
Is Search Results Page Shown?
This decision checks if an element on the search results page exists. If it does not, then continues to the second decision to decide whether to perform another attempt.
Max. Attempts Exceeded?
This decision checks if the Search button has been clicked more than three times. If it has been, then directs the workflow to display a failure message. Otherwise allows another attempt.


-
Ensure that workflows are readable so that they can be understood and maintained by others.
-
Organize the steps and transitions in a clear and methodical way.
-
Align steps and actions neatly.
-
The recommended naming convention naming workflow steps is upper CamelCase, for example, GetCustomer and SendEmail.