Configure the Invoking Project
This topic explains how to configure a project to invoke a robotic workflow in an automation solution.
For an overview of the use of robotic workflows, see here.
The robotic workflow must have been built, configured, and uploaded to a Real-Time Server before the invoking project can be configured to invoke the robotic workflow.
The process of configuring a project to invoke a robotic workflow is as follows:
-
Import a robotic workflow into the invoking project.
-
Invoke the robotic workflow using its Invoke method.
-
Monitor whether the robotic workflow is invoked successfully.
-
Delete a robotic project from an invoking project.
-
Update references to a new version of a robotic workflow.
A video demonstration of this process is available here.
Import the Robotic Workflow
When building the invoking project that will invoke the robotic workflow, you must first import that robotic workflow into your project. The robotic workflow and its Invoke method will then be listed in the Assets Panel.
The robotic workflow does not become part of your project, and you cannot edit that workflow from your project.
Note the following about importing robotic workflows:
-
Automation Studio must be connected to the Real-Time Server when importing a robotic workflow.
-
You can only import projects that have been published to a Real-Time Server.
-
You can only import workflows from one version of each project.
If you import a workflow from one version of a specific project, you can't then import workflows from another version of that same project. You must first delete the existing workflow references (see Delete a Robotic Workflow Reference).
-
All robotic workflows in the selected project are imported. It is not possible to select specific robotic workflows to import.
To import a robotic workflow:
-
Open the project that will invoke the robotic workflow.
-
Connect to the Real-Time Server that hosts the project that includes the workflows you want to import, if not already connected.
-
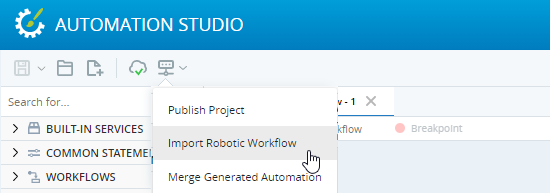
Click Server Actions.
-
Click Import Robotic Workflow.
-
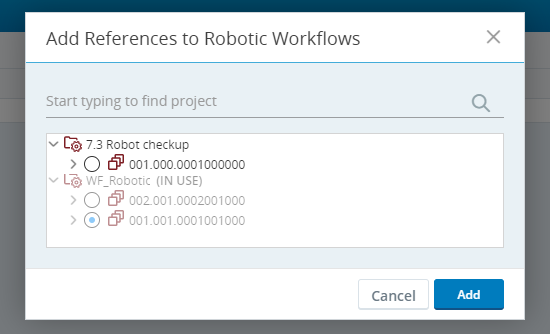
The Import Robotic Workflows window lists:
-
All projects published to the Real-Time Server
-
All versions of each project
-
All workflows in each version
Only workflows that were configured to be available for execution by robots are listed. Also, only projects and versions that include such workflows are listed.
If you have previously imported a robotic workflow and have used that workflow's Invoke method in your project, that workflow and its project will be marked as (In Use) and displayed in gray. Such a workflow cannot be unselected. To be able to unselect such a workflow, first remove all references to its Invoke method in your project.
-
-
Select one version of every project that includes workflows you want to import.
-
Click Add.
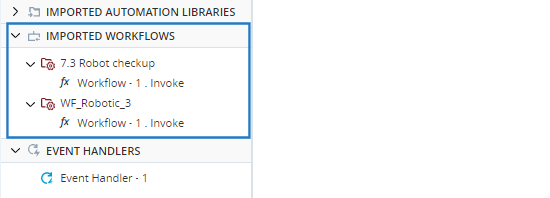
All added projects and their workflows are listed in the Assets Panel. Each workflow has just one asset - its Invoke method.
Invoke a Robotic Workflow
You can invoke a robotic workflow from the invoking project using the robotic workflow's Invoke method.
You can invoke a robotic workflow from:
-
An event handler, from its Do area
-
A callout, from a callout control's event handler
The Invoke method requires that a number of generic parameters be specified.
|
Parameter |
Description |
|---|---|
|
Priority |
The priority level of the workflow. The Real-Time Server allocates invoked workflows to available robots for execution based on their priority levels. |
|
In-Queue Timeout |
The length of time that the robotic workflow will be allowed to wait in the queue for execution before being deleted from the queue. (Seconds) |
|
Execution Timeout |
The length of time that the robotic workflow will be allowed to run from the time execution begins before being timed out. (Seconds) |
Note: In-Queue Timeout and Execution Timeout parameters are available from version 7.1 only.
In addition, the robotic workflow's input parameters are displayed and must be specified.
Note that the maximum number of characters that can be transferred to an invoked workflow per input parameter is 100 characters. For example, the maximum number of characters that can be transferred in a text input parameter is 100 characters.
Instructions are provided below for invoking a robotic workflow from a step in a workflow. The process for invoking a robotic workflow from an event handler is similar.
To invoke a robotic workflow from a workflow:
-
Select the step in your local workflow at which the robotic workflow must be invoked.
-
In the Assets Panel, expand the Workflow References section and expand the relevant project. (This section is populated when adding workflow references, see Import the Robotic Workflow).
-
Drag the Invoke method for the relevant workflow into the Builder area.
-
Specify the method's generic and specific parameters.
Monitor Invoked Workflow Success
An invoke robotic workflow function returns a response message of type Text.
If the Real-Time Server accepts the request to execute a robotic workflow, a message success (lower case) is returned. If the Real-Time Server finds an error in the request, the error message itself is returned.
XML:[E18] Invalid input XML. XML input:
<invoke_server_req xmlns="http://www.sample.com/robotic_automation/invoke" xmlns:wsa="http://schemas.xmlsoap.org/ws/2004/03/addressing" xmlns:xsd="http://www.w3.org/2001/XMLSchema" xmlns:wsu="http://docs.sample-open.org/wss/2004/01/sample-200401-wss-wssecurity-utility-1.0.xsd" xmlns:wsse="http://docs.sample-open.org/wss/2004/01/oasis-200401-wss-wssecurity-secext-1.0.xsd" xmlns:soap="http://schemas.xmlsoap.org/soap/envelope/" xmlns:xsi="http://www.w3.org/2001/XMLSchema-instance">
<req_header xmlns="">
<guid>9f77a72b-4fa6-4fd8-999e-a68138cd43ac</guid>
<os_uid>sample-sample\sample</os_uid>
<external_invoker_request_id>1</external_invoker_request_id>
<initiator_type>AGENT_CLIENT</initiator_type>
<initiator_id>sample\gl0</initiator_id>
</req_header>
<sequence xmlns="">
<req_data>
<timeouts_header>
<queue_timeout_in_sec>21600</queue_timeout_in_sec>
<execution_timeout_in_sec>7200</execution_timeout_in_sec>
</timeouts_header>
<workflow_header>
<solution>dproj_1bsampleCCvOQHdmKojgEPibhs9g</solution>
<workflow_id>$Project.workflowItem_04ce5casamplee_e168_403a_ae8c_1e6812a75dc9</workflow_id>
<workflow_priority>4</workflow_priority>
</workflow_header>
<workflow_data/>
</req_data>
</sequence>
</invoke_server_req>
No further responses are provided. For example, there is no indication of whether the robotic workflow was actually executed by a robot, whether its execution ended, or whether its execution was successful.
In the example below, the response received after invoking the robotic workflow SendSMS is written to the text variable InvokeResponse.
Delete a Robotic Workflow Reference
To delete a project from under Imported Workflows, click Delete from its menu.
For more information about deleting a solution component, see here


